API Requests
Learn how to create, configure, and send HTTP requests using Fetch Client.
🚀 Create Your First Request
Creating a request only takes a few steps:
- Click New Request.
- Select an HTTP Method.
- Enter the request URL.
- Configure authentication (if required).
- Add headers, query parameters, or a request body.
- Click Send.
🌐 HTTP Methods
Fetch Client supports all standard HTTP methods.
| Method | Description | Common Use |
|---|---|---|
| GET | Retrieve data | Fetch users |
| POST | Create resources | Create a user |
| PUT | Replace resources | Update a user |
| PATCH | Partially update resources | Change an email |
| DELETE | Remove resources | Delete a user |
| HEAD | Retrieve headers only | Check resource availability |
| OPTIONS | Discover supported methods | API capabilities |
🔗 URL & Query Parameters
Query parameters allow you to pass additional information in the URL.
https://api.example.com/users?page=1&limit=10
To add query parameters:
- Open the Query Params tab.
- Click Add Parameter.
- Enter the parameter name and value.
- The request URL updates automatically.
🔐 Authentication
Fetch Client supports multiple authentication methods.
| Authentication | Best For |
|---|---|
| Basic Auth | Username & Password |
| Bearer Token | JWT & Access Tokens |
| API Key | Header or Query authentication |
| AWS Signature | AWS APIs |
| OAuth 2.0 | Enterprise authentication |
Basic Auth
- Username & Password authentication.
- Credentials are automatically Base64 encoded.
Bearer Token
- Uses access tokens (JWT).
- Automatically adds the
Authorizationheader.
API Key
Supports:
- Header
- Query Parameter
AWS Signature
Supports AWS Signature Version 4 authentication.
Configure:
- Access Key
- Secret Key
- Region
- Service
OAuth 2.0
Uses the OAuth 2.0 protocol to securely obtain and use access tokens.
Supported grant types:
- Authorization Code
- Authorization Code with PKCE
- Client Credentials
- Resource Owner Password Credentials (Password)
Features:
- Automatic authorization flow for Authorization Code
- PKCE support with configurable code challenge methods
- Automatic access token retrieval and injection
- Configurable client authentication (Header or Request Body)
- Custom scopes
- Audience and Resource parameters
- Custom token field name
- Variable support for OAuth configuration values
How to set up:
- Select OAuth 2.0 from the Auth tab.
- Choose the required Grant Type.
- Configure the required settings:
- Access Token URL
- Authorization URL (Authorization Code only)
- Client ID
- Client Secret
- Scope (optional)
- Configure any advanced options such as:
- Client Authentication
- Audience
- Resource
- Token Name
- Click Get New Token.
- Fetch Client completes the authorization flow, retrieves the access token, and automatically includes it in the
Authorizationheader for subsequent requests.
📝 Headers
Headers provide additional metadata for requests.
Examples include:
- Authorization
- Content-Type
- Accept
- User-Agent
- Cache-Control
Features:
- Header auto-completion
- Header value suggestions
- Enable/Disable headers
- Automatic Content-Type detection
📦 Request Body
Choose the request body format that matches your API.
| Type | Description |
|---|---|
| Form Data | Upload files and form fields |
| Form URL Encoded | HTML form submissions |
| Raw | JSON, XML, Text |
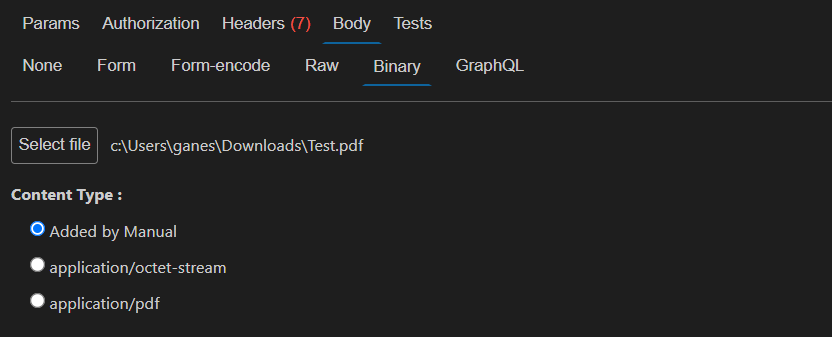
| Binary | Upload a file |
| GraphQL | GraphQL queries & variables |
Form Data
Use multipart form data to upload files.
Form URL Encoded
Send standard HTML form data.
Raw
Supported content types:
- JSON
- XML
- Plain Text
- HTML
Binary
Upload a single file with automatic content-type detection.
GraphQL
Supports:
- Queries
- Mutations
- Variables
Example query:
query GetUser($id: ID!) {
  user(id: $id) {
    name
    email
  }
}
Example variables:
{
  "id": "12345"
}
🌍 Variables
Variables can be used throughout requests.
{{base_url}}/users

Authorization:
Bearer {{access_token}}
Supported variable scopes:
- Global Variables
- Collection Variables
- Request Variables
- Environment Variables
- System Variables
- Use environments instead of hardcoded URLs.
- Store secrets in variables.
- Save frequently used requests into collections.
- Reuse authentication with variables.
- Add tests to validate responses automatically.